Did you know a WordPress plugin can help you clone your main site into a staging site in just a few clicks? It’s just one of many ways to create a staging WordPress site. Intrigued? Keep reading!
Why a Staging Site?
A staging site is essentially a clone of your live website. Developers create this duplicate as a sandbox to test changes and experiment without impacting the live site.
Whether fixing plugin conflicts, debugging issues, testing new themes, adding code snippets, or trying out new plugins, a staging site offers a safe environment for all this.
3 Main Ways to Create a Staging WordPress Site
- Use the WP STAGING plugin to clone your site
- Utilize your current hosting provider’s staging creation services
- Manually set up a WordPress staging site
Let’s delve into each method in detail.
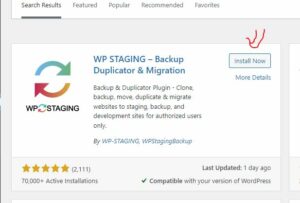
Method 1: Use WP STAGING Plugin
Using the WP STAGING plugin is one of the easiest ways to clone your WordPress site. Here’s how:
Step 1: Install the Plugin:
Navigate to your WordPress dashboard, click ‘Plugins,’ then ‘Add New.’ In the search bar, type “WP STAGING” and install it, then activate it.
Step 2: Create a Staging Site:
You’ll see the WP Staging section in the dashboard navigation after activation. Click ‘Staging Sites’ and then the ‘Create Staging Site’ button.

Step 3: Start Cloning:
Click ‘Start Cloning’ and wait for the process to complete.
Upon completion, the URL of the staging site will be displayed.
Click ‘Open Staging Site’ to check out the newly created clone. Be mindful that this method will utilize your current hosting storage, so ensure you check your storage usage before proceeding.

Method 2: Use Your Hosting Provider’s Dedicated Website Cloning Service
Many premium WordPress hosting providers include a one-click site cloning service.
For instance, Cloudways offers its Staging management for your WordPress application. Always inquire if your hosting provider offers this service.

Method 3: Clone Your Site Manually
If the above two methods are not viable, you must clone the site manually. While this process requires more effort, it’s certainly not rocket science.
Step 1: Choose a Host:
If you already have a web hosting provider, create a new WordPress site as you normally would.
If your host uses cPanel, follow this guide to create the site.
Step 2: Install Migration Tools:
Add a new plugin called “Migrate Guru” in your main site’s WP dashboard, install, and activate it.

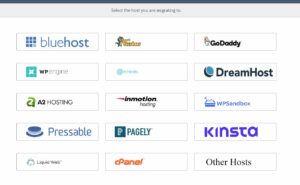
Step 3: Choose Your Migration Option:
Migrate Guru offers several migration options, depending on your web hosting provider.
If your provider is listed, the setup process is straightforward.
If not, choose the cPanel option or the ‘Other Hosts’ option.
Step 4: Provide the New Site Info:
Supply the necessary info for migrating to the new site, then wait for the process to complete.
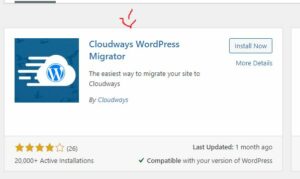
Bonus Point:
If you’re using Cloudways, you can use the “Cloudways Migrate” instead.
With this guide, you should now have a clear path forward in creating your staging site.