TL;DR
If you already have a web hosting subscription that includes cPanel and are familiar with how to access cPanel, you can quickly install WordPress. Search for “Softaculous” in the cPanel portal, typically under the software category, select “WordPress,” and click install.
However, the process might vary depending on the configuration of your specific hosting provider. If you need help, continue reading this comprehensive guide for more detailed steps.
What is cPanel?
Just in case you don’t know, cPanel is a widely-used web hosting control panel software that offers a graphical interface and automation tools to simplify website hosting.
It’s a convenient tool that many web hosts provide, allowing customers to easily manage their websites, emails, files, and other online aspects.
However, due to recent increases in cPanel license pricing, many web hosting companies have opted to develop their control panels. These alternatives may have different layouts and functionalities, but they generally aim to provide a similar user experience to cPanel.
How to Access cPanel
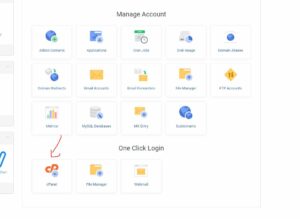
Accessing cPanel is typically done through your web hosting client portal, as shown below:
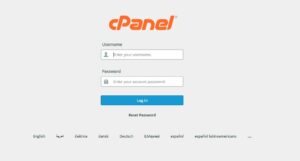
Alternatively, you can try accessing it by typing your domain name followed by “/cpanel” (e.g., www.yourdomainname.com/cpanel) or “cpanel.” before your domain name (e.g., cpanel.yourdomainname.com).
Both methods should direct you to the cPanel login page:
If you’re still unable to access cPanel, it’s recommended to contact your hosting provider for assistance.
How to Install WordPress in cPanel
After successfully logging into cPanel, you’ll be presented with an interface similar to this:
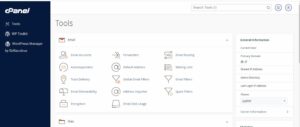
The design of the portal may vary depending on the software version and configuration set by your web hosting provider, but the general structure should be similar.
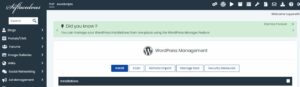
To install WordPress, search for “Softaculous” in the search bar. You’ll likely see two results: “Softaculous Apps Installer” and “WordPress Manager by Softaculous”.
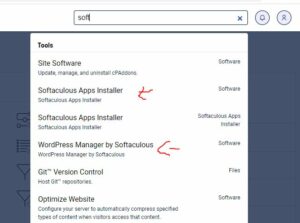
While both serve the same purpose, choosing “WordPress Manager by Softaculous” will lead you to the WordPress installation interface.
On the Softaculous page, click “Install”:
Next, complete the necessary information, such as your site name, admin username, and password.
After verifying that all the details are correct, click “Install”. Within a few moments, your new WordPress site should be ready for you to customize and manage.
Congratulations! You’ve successfully installed WordPress through cPanel. Your website is ready to begin creating and publishing your content. Enjoy the journey of building your online presence with WordPress!